MSP Serverless平台应用开发 #
一、基本概念梳理 #
本文主要介绍基于 msp serverless 平台的分布式开发概念和流程。通过以 wasm 为最小单元的开发,充分适用于当前的分布式开发环境。在展开介绍应用开发之前,我们需要熟悉其几个概念。
无论是采用传统的单体应用开发模式,还是微服务开发模式,亦或是 serverless,其解决的问题基本类似,只不过不同的模式下的叫法有差异而已。
一般而言,应用的开发都可以划分为以下几个部分:
- 纯业务逻辑。如:商品功能,会员功能等。面向业务开发人员。
- 中间件。如:数据库中间件,缓存中间件,流量控制等。面向中间件开发人员,或平台开发*人员。*
- 运行环境。根据不同的技术栈,有不同的运行环境,属于基础设施层。比如采用容器部署的,一般运行在k8s里,这部分面向平台开发人员。
在 msp serverless 平台中具有相似的概念,这里列举如下:
| 概念 | 面向人员 | 说明 |
|---|---|---|
| actor | 业务开发 | 编写业务逻辑的地方,如果涉及到非业务逻辑的公共能力(或中间件能力),通过引用interface的方式来获取能力。业务人员可使用rust或tinyGo来开发actor。 |
| interface | 中间件或平台开发 | 定义一些业务无关的公共能力接口,比如:keyvalue能力,但是不提供具体的实现。可以在 interface 中定义允许的操作(operations),以及各种结构体(structure)。使用 smithy IDL 进行 interface 的定义,使用 wash 工具来生成对应代码。 |
| provider | 中间件或平台开发 | 实现interface的能力,比如同样对于keyvalue功能,可以有redis实现,也可以有vault实现。并且可以用不同的技术栈来实现。可使用 rust 来进行 Provider 开发,官方未来会支持 Go。 |
| link def | 业务开发或部署人员 | 由于actor只是引用了具体的interface,并没有指定哪一个provider,所以在实际部署时,需要关联actor和provider。可以通过 shell(wash)命令行,或者平台进行操作。 |
| wasm host | 中间件或平台开发 | 作为整个 msp serverless 生态的运行基石,用于协调actor,provider之间的分布式通信,同时也提供分布式调度能力。采用 Elixir/OTP 技术栈实现。 |
整体的关系图梳理如下:
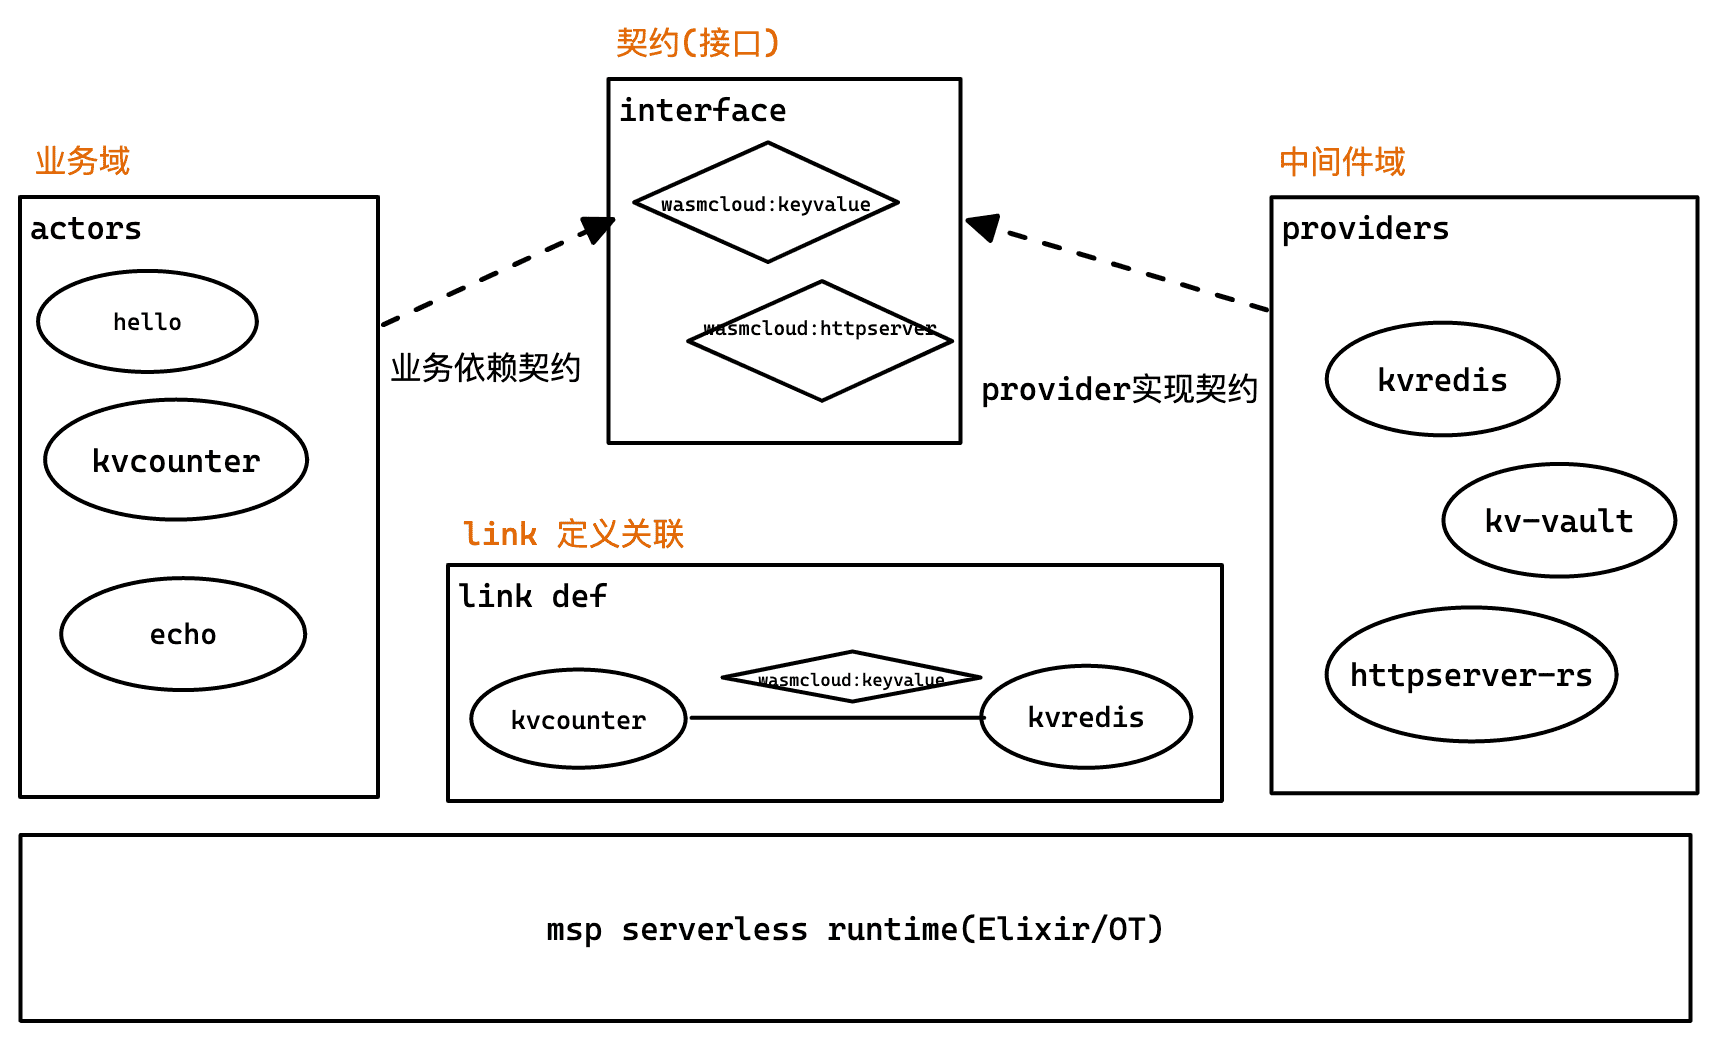
msp serverless app 的开发采用基于契约(接口)的开发方式进行,其中 interface 就是契约的定义。
三、开发流程 #
如果我们需要实现一个全新的业务场景,需要进行以下几个步骤:

接下来以 kvcounter 为例,进一步说明各个环节。
示例目标: #
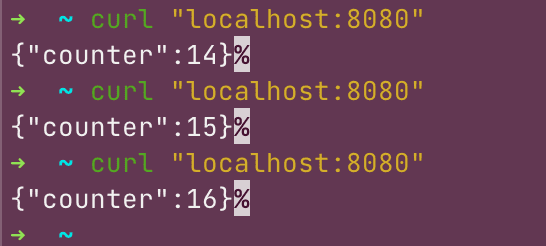
开发一个 kvcounter 示例程序,当用户访问 http://localhost:8080 时,能够正常显示 counter,且每次访问 +1。
示例效果如下:
1、创建(或使用)interface #
在本示例中,我们用到了 kv 功能,所以需要找到一个能够提供 keyvalue 功能的 interface。有两种方式,一是找到一个现成可用的interface,二是定义一个keyvalue 的 interface。
这里以定义一个新的 keyvalue 为例。
1.1 使用 wash 工具创建新的 interface #
wash new interface keyvalue
1.2 编写 interface,即:smithy 文件 #
首先确定该接口提供的操作,然后是每个操作(operations)涉及到的结构体(structure):
// key-value.smithy
// Definition of a key-value store and the 'wasmcloud:keyvalue' capability contract
//

// Tell the code generator how to reference symbols defined in this namespace
metadata package = [{
    namespace: "org.wasmcloud.interface.keyvalue",
    crate: "wasmcloud_interface_keyvalue",
    py_module: "wasmcloud_interface_keyvalue",
    doc: "Keyvalue: wasmcloud capability contract for key-value store",
}]

namespace org.wasmcloud.interface.keyvalue

use org.wasmcloud.model#wasmbus
use org.wasmcloud.model#rename
use org.wasmcloud.model#n
use org.wasmcloud.model#U32
use org.wasmcloud.model#I32

@wasmbus(
    contractId: "wasmcloud:keyvalue",
    providerReceive: true )
service KeyValue {
  version: "0.1.1",
  operations: [
    Increment, Contains, Del, Get,
    ListAdd, ListClear, ListDel, ListRange,
    Set, , SetAdd, SetDel, SetIntersection, SetQuery, SetUnion, SetClear,
  ]
}

/// Gets a value for a specified key. If the key exists,
/// the return structure contains exists: true and the value,
/// otherwise the return structure contains exists == false.
@readonly
operation Get {
  input: String,
  output: GetResponse,
}

/// Response to get request
structure GetResponse {
    /// the value, if it existed
    @required
    @n(0)
    value: String,
    /// whether or not the value existed
    @required
    @n(1)
    exists: Boolean,
}

/// Sets the value of a key.
/// expires is an optional number of seconds before the value should be automatically deleted,
/// or 0 for no expiration.
operation Set {
  input: SetRequest,
}

structure SetRequest {
    /// the key name to change (or create)
    @required
    @n(0)
    key: String,

    /// the new value
    @required
    @n(1)
    value: String,

    /// expiration time in seconds 0 for no expiration
    @required
    @n(2)
    expires: U32,
}

/// Deletes a key, returning true if the key was deleted
@rename([{lang:"Python", name:"delete"}])
operation Del {
  input: String,
  output: Boolean,
}

/// Increments a numeric value, returning the new value
operation Increment {
  input: IncrementRequest,
  output: I32
}

structure IncrementRequest {
    /// name of value to increment
  @required
  @n(0)
  key: String,
  /// amount to add to value
  @required
  @n(1)
  value: I32,
}

/// list of strings
list StringList {
  member: String
}

/// Append a value onto the end of a list. Returns the new list size
operation ListAdd {
  input: ListAddRequest,
  output: U32
}

/// Parameter to ListAdd operation
structure ListAddRequest {
    /// name of the list to modify
    @required
    @n(0)
    listName: String,

    /// value to append to the list
    @required
    @n(1)
    value: String,
}

/// Deletes a value from a list. Returns true if the item was removed.
operation ListDel{
  input: ListDelRequest,
  output: Boolean
}

/// Removes an item from the list. If the item occurred more than once,
/// removes only the first item.
/// Returns true if the item was found.
structure ListDelRequest {
    /// name of list to modify
  @required
  @n(0)
  listName: String,
  @required
  @n(1)
  value: String
}

/// Deletes a list and its contents
/// input: list name
/// output: true if the list existed and was deleted
operation ListClear {
  input: String,
  output: Boolean
}

/// Retrieves a range of values from a list using 0-based indices.
/// Start and end values are inclusive, for example, (0,10) returns
/// 11 items if the list contains at least 11 items. If the stop value
/// is beyond the end of the list, it is treated as the end of the list.
operation ListRange {
    input: ListRangeRequest,
    output: StringList,
}

structure ListRangeRequest {

    /// name of list
    @required
    @n(0)
    listName: String,

    /// start index of the range, 0-based, inclusive.
    @required
    @n(1)
    start: I32,

    /// end index of the range, 0-based, inclusive.
    @required
    @n(2)
    stop: I32,
}

/// Add an item into a set. Returns number of items added (1 or 0)
operation SetAdd {
  input: SetAddRequest,
  output: U32,
}

structure SetAddRequest {
    /// name of the set
    @required
    @n(0)
    setName: String,
    /// value to add to the set
    @required
    @n(1)
    value: String,
}

/// Deletes an item from the set. Returns number of items removed from the set (1 or 0)
operation SetDel {
  input: SetDelRequest,
  output: U32,
}

structure SetDelRequest {
  @required
  @n(0)
  setName: String,

  @required
  @n(1)
  value: String,
}

/// perform union of sets and returns values from the union
/// input: list of sets for performing union (at least two)
/// output: union of values
operation SetUnion {
  input: StringList,
  output: StringList,
}

/// perform intersection of sets and returns values from the intersection.
/// input: list of sets for performing intersection (at least two)
/// output: values
operation SetIntersection {
  input: StringList,
  output: StringList,
}

/// Retrieves all items from a set
/// input: String
/// output: set members
operation SetQuery {
  input: String,
  output: StringList,
}

/// returns whether the store contains the key
@readonly
operation Contains {
  input: String,
  output: Boolean,
}

/// clears all values from the set and removes it
/// input: set name
/// output: true if the set existed and was deleted
operation SetClear {
    input: String
    output: Boolean
}
我们看到 smithy 文件只定义了相关的接口,并不涉及到具体的实现。这也是 msp serverless app开发中比较重要的概念。
actor只依赖于具体的interface,而一个interface可以由多个provider来实现。
1.3 生成代码,发布到对应的仓,方便actor开发人员使用 #
我们可以直接执行 make 指令,生成对应的代码。之后可以把 interface 发布到 crate.io,或者使用本地路径的方式作为包依赖引入(Go语言同理,进行发包即可)。这样在实际开发 actor 时,就可以将 interface 作为项目的依赖包直接引入使用。
2、开发 provider #
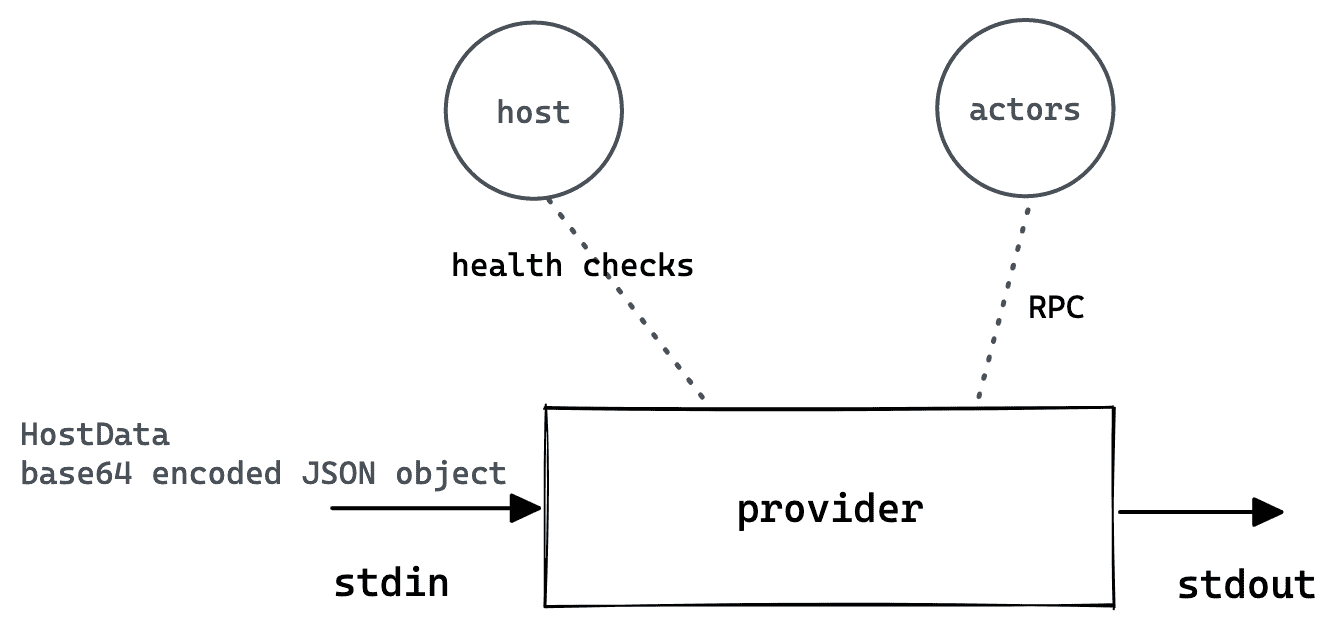
provider的作用如下:启动后,通过 stdio 和 host 进行交互,其主要作用包括:健康检查、通过 RPC 和 actor 交互等。
2.1 使用 wash 新建 provider #
通过 wash 指令,可以生成 provider 的模板代码
wash new provider kvredis
2.2 编写 provider #
重点是基于 redis 实现 interface 中定义的各种 operations,完整代码见链接,核心代码框架摘录如下:
/// Handle KeyValue methods that interact with redis
#[async_trait]
impl KeyValue for KvRedisProvider {
		/// Increments a numeric value, returning the new value
    #[instrument(level = "debug", skip(self, ctx, arg), fields(actor_id = ?ctx.actor, key = %arg.key))]
    **async fn increment**(&self, ctx: &Context, arg: &IncrementRequest) -> RpcResult<i32> {
        let mut cmd = redis::Cmd::incr(&arg.key, &arg.value);
        let val: i32 = self.exec(ctx, &mut cmd).await?;
        Ok(val)
    }

    /// Deletes a key, returning true if the key was deleted
    #[instrument(level = "debug", skip(self, ctx, arg), fields(actor_id = ?ctx.actor, key = %arg.to_string()))]
    **async fn del**<TS: ToString + ?Sized + Sync>(&self, ctx: &Context, arg: &TS) -> RpcResult<bool> {
        let mut cmd = redis::Cmd::del(arg.to_string());
        let val: i32 = self.exec(ctx, &mut cmd).await?;
        Ok(val > 0)
    }

    /// Gets a value for a specified key. If the key exists,
    /// the return structure contains exists: true and the value,
    /// otherwise the return structure contains exists == false.
    #[instrument(level = "debug", skip(self, ctx, arg), fields(actor_id = ?ctx.actor, key = %arg.to_string()))]
    **async fn get**<TS: ToString + ?Sized + Sync>(
        &self,
        ctx: &Context,
        arg: &TS,
    ) -> RpcResult<GetResponse> {
        let mut cmd = redis::Cmd::get(arg.to_string());
        let val: Option<String> = self.exec(ctx, &mut cmd).await?;
        let resp = match val {
            Some(s) => GetResponse {
                exists: true,
                value: s,
            },
            None => GetResponse {
                exists: false,
                ..Default::default()
            },
        };
        Ok(resp)
    }

    /// Sets the value of a key.
    /// expires is an optional number of seconds before the value should be automatically deleted,
    /// or 0 for no expiration.
    #[instrument(level = "debug", skip(self, ctx, arg), fields(actor_id = ?ctx.actor, key = %arg.key))]
    **async fn set**(&self, ctx: &Context, arg: &SetRequest) -> RpcResult<()> {
        let mut cmd = match arg.expires {
            0 => redis::Cmd::set(&arg.key, &arg.value),
            _ => redis::Cmd::set_ex(&arg.key, &arg.value, arg.expires as usize),
        };
        let _value: Option<String> = self.exec(ctx, &mut cmd).await?;
        Ok(())
    }
2.3 生成 provider 产物 #
简单的使用 make 指令即可完成部署产物,该产物可以推送至 OCI 仓库以方便使用。
2.4 推送到仓库 #
可以通过 make push 指令将打包后的代码推送到镜像仓库。你需要修改 Makefile 中的 REG_URL 配置为自己需要推送的镜像仓库。如果你是测试的仓库,通过 http 协议访问,那么就可以正常推送了。如果你是正式的仓库,需要通过https访问和用户鉴权,那么你还要修改 Makefile 中的PUSH_REG_CMD 选项为wash reg push $(REG_URL) ,并且通过 WASH_REG_USER 和 WASH_REG_PASSWORD 两个环境变量分别定义用户名和密码。
3、开发 actor #
actor 是 msp serverless 技术生态中最小的部署单元,它同时也是 wasm 模块。它用来处理 msp serverless host 传递给他的消息,并且可以调用 provider 提供的函数。
3.1 新建 actor #
使用 wash 指令可以很方便的生成便于快速开发的模板代码:
wash new actor kvcounter
3.2 开发 actor #
声明契约依赖
kvcounter 依赖了两个 interface,用来提供两个能力:httpserver能力和 kv 存储能力。
我们需要声明该依赖,这样打包完成 kvcounter 后,可以 inspect 出对应的信息。
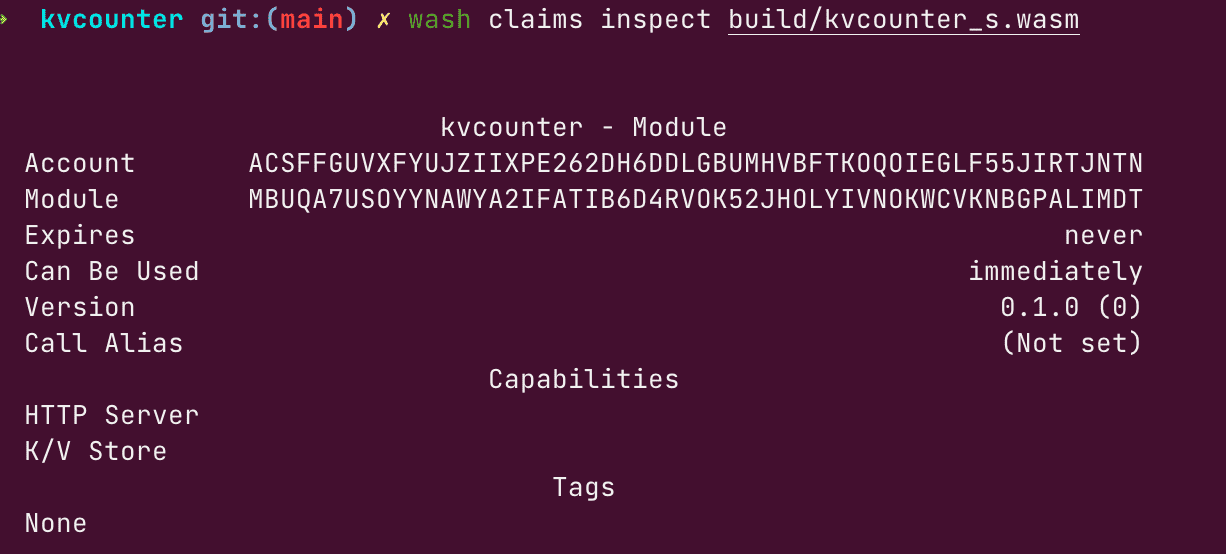
所以我们需要修改 makefile 的 CLAIMS 信息:
# examples/actor/kvcounter

PROJECT  = kvcounter
VERSION  = $(shell cargo metadata --no-deps --format-version 1 | jq -r '.packages[] .version' | head -1)
REVISION = 0
# list of all contract claims for actor signing (space-separated)
**CLAIMS   = wasmcloud:httpserver wasmcloud:keyvalue**
使用 interface
根据不同语言,我们可以引入不同的 interface package。以 rust 为例,我们可在 cargo.toml 中加入 kvcounter 所依赖的两个包:
[package]
name = "kvcounter"

[dependencies]
**wasmcloud-interface-keyvalue = "0.7.0"**
**wasmcloud-interface-httpserver = "0.6.0"**
在 actor 中调用:
#[async_trait]
impl HttpServer for KvCounterActor {
    async fn handle_request(&self, ctx: &Context, req: &HttpRequest) -> RpcResult<HttpResponse> {
        // increment the value in kv and send response in json
        let (body, status_code) = match **increment_counter**(ctx, key, amount).await {
            Ok(v) => (json!({ "counter": v }).to_string(), 200),
            // if we caught an error, return it to client
            Err(e) => (json!({ "error": e.to_string() }).to_string(), 500),
        };
        let resp = HttpResponse {
            body: body.as_bytes().to_vec(),
            status_code,
            ..Default::default()
        };
        Ok(resp)
    }
}

/// increment the counter by the amount, returning the new value
async fn increment_counter(ctx: &Context, key: String, value: i32) -> RpcResult<i32> {
    let new_val = KeyValueSender::new()
        **.increment(ctx, &IncrementRequest { key, value })**
        .await?;
    Ok(new_val)
}
3.4 打包 #
我们可以使用 make 指令,将代码打包为 .wasm 文件,进而推送到 OCI 仓库。
3.5 推仓 #
可以通过 make push 指令将打包后的代码推送到镜像仓库。你需要修改Makefile中的 REG_URL 配置为自己需要推送的镜像仓库。如果你是测试的仓库,通过http协议访问,那么就可以正常推送了。如果你是正式的仓库,需要通过https访问和用户鉴权,那么你还要修改Makefile中的 PUSH_REG_CMD 选项为 wash reg push $(REG_URL) ,并且通过WASH_REG_USER和WASH_REG_PASSWORD两个环境变量分别定义用户名和密码。
当然你可以通过wash命令而不是make命令直接推送:wash reg push yourharbor/name:version build/wasmfile
4、部署 #
我们可以使用 wasm shell(即 wash) 或者 web dashboard 进行部署。主要进行如下操作:
- start actors。将 actor 的 wasm 文件上传到 serverless runtime,或者提供 registry 地址供其下载。
- start providers。将 provider 的包上传到 serverless runtime,或提供 registry 地址供其下载。
- 建立 link 关系。
在平台的操作截图效果如下:
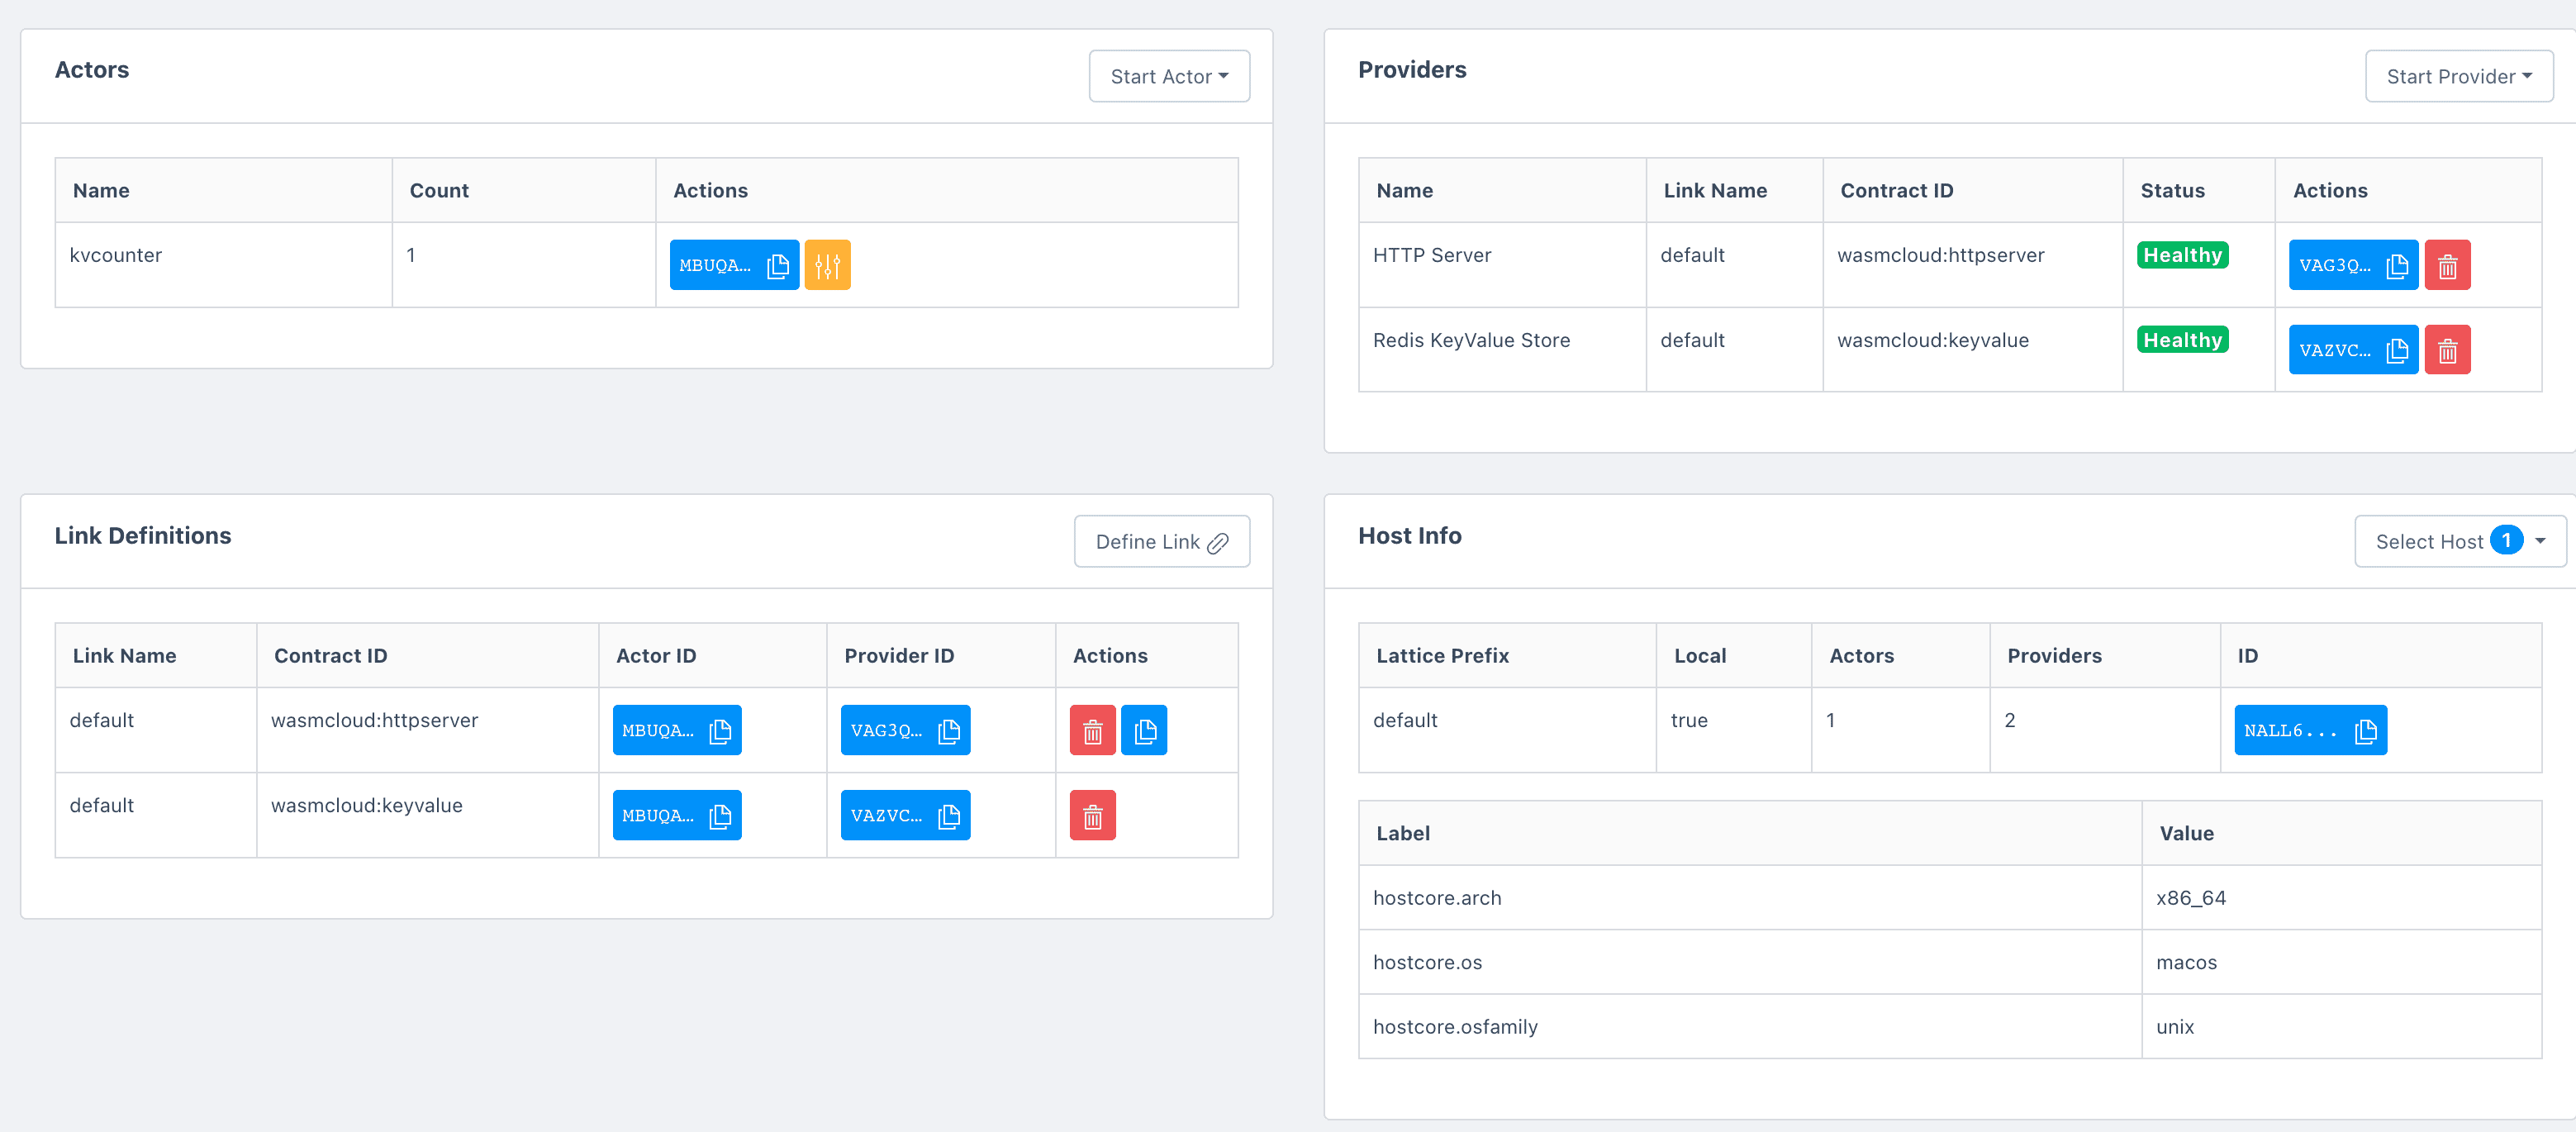
这里需要注意的是,kvcounter 的 actor 需要分别与 httpserver 以及 kvredis 的 provider 进行 link,也就是有两条 link 记录。
5、访问 #
至此,已能正常通过 http 进行访问。
➜  ~ curl localhost:8080
{"counter":17}%
➜  ~ curl localhost:8080
{"counter":18}%
总结 #
本文主要是梳理了 msp serverless 应用开发的概况,包括其主要涉及的概念、工具链的使用、主要的开发流程。在使用过程中,如您遇到问题,可联系 msp 平台团队获取更多支持。